Wednesday, 25 January 2017

I'm moving my blog: Goodbye blogger!


So I'm moving my blog from Blogger to Wordpress.  It's been a long time coming as I've found Blogger more and more glitchy to use. The final thing that's made me move is that I can't add photos to my blog from my phone or iPad.  I'm sure there will be ways around it but I'd rather just be able to do it simply and effectively. I've used Blogger for many years with a variety of blogs and it has been fun but it's time for a change. 

I'll also not be using the name 'Floating Knees' anymore, mainly because I want my blog to match up with my website so it's new name is my own name.  I have listed it on Bloglovin and moved my followers over to it, something I didn't realise I could do! That has made the move much more simple.

If you'd like to carry on following me then please do head over to my new blog at:

www.sannadykerblog.wordpress.com


I'll be closing down this blog soon but hopefully I'll see you over on Wordpress!

Sunday, 22 January 2017

My Old Photograph Collection: The Newest Additions


I thought I'd do a little update of my old photograph collection, showing you my most recent additions.  As you may or may not know, I find most of my photographs on eBay although I have found the odd few in antique shops. It takes me a while to pick the ones I want to add to my collection because they have to 'feel right'.  I know that sounds a bit odd but there are so so many old photos out there and my collection would be overflowing if I bought them all.  I therefore spend a lot of time finding ones that fit the rest of my collection.  I love photos of people and there's usually something in their face, a warmth, a smile, an intriguing personality that gives me an instant connection to them.  Choosing the photograph is half the fun and doing so I have created a little family of strangers who are all displayed together, gazing out from my shelves. These little faces are so important to me and by displaying them and having had some of them for years they really do feel like family. 

Just to note, apologies for the quality of these shots today.  My camera SD card seems to have died on me and I don't have a spare! So these were all taken on my phone. 


The first of my new additions is this beautiful family portrait.  I've also photographed the back as the designs are often just as beautiful. If you look very closely at the photograph, I think the little girl is wearing a pair of spectacles but it's hard to see straight away.


I think this photo of a mother and her child is so incredibly perfect. The back is difficult to read and if anyone can help me decipher it I'd be incredibly grateful! From what I can read I think it says 'Dorothy Mary Fleece? Millete? Born May? 28th 1874 Aged 4 Months'.


The handsome photo on the left has slight damage but is otherwise very crisp and and in good condition.  I love the one on the right that captures the excitement of Christmas morning.


This next photo is one of my favourites. A group of young men and women who I'm guessing are siblings due to some of the similarities in facial features.  I love their expressions, clothes and also the fact it was created in a photographic studio in Glasgow. Photos like these where there are a group of interesting personalities are the kind that make me wish I could have met them.  It's quite fun to try and imagine who they were and what they were like.


I decided to have a browse for photographs on Christmas Eve and stumbled across this one.  The little girls dress is so sweet. On the back is the single word 'Rudge', which could either be the family name or perhaps the name of the photographer.


Next up is this lovely photo which has notes on the back saying that it is the 'christening of Violet'.  I think their names are Narci (sitting), Rosie (Standing) and Julia. To have names for people in photographs is just the most special thing. I got this photo from an antiques shop in Edinburgh and it was dated 1922.


This next photo also came from the same antiques shop and the note on the back says, ' Received this on 2nd April 1911'. I keep this one away from any light as it is quite a bit more faded than the others.


The next photo is of a solider and the photograph seems to have been taken in a studio in Saarburg.  His eyes look incredibly youthful and I'm not even sure that he has a moustache.  It looks like a mark on the photograph from closer inspection.


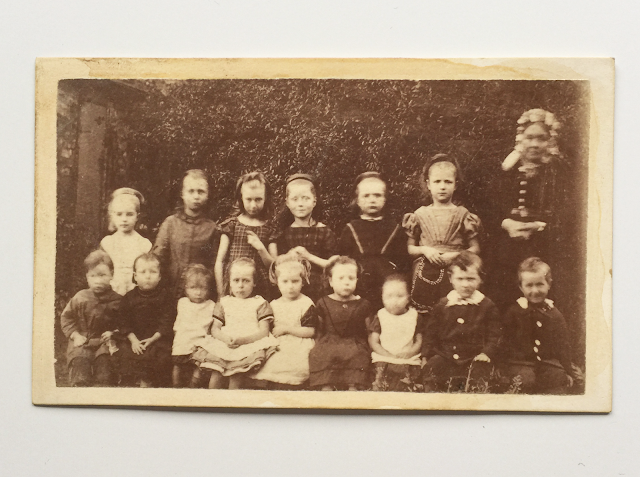
Lastly, a charming school photograph.  The photo itself is very small and I love how it's quite blurry, probably from the children not being able to sit still while the photo was being taken.

I have more photographs on the way and the collection is continuing to grow at a healthy pace. I can't stress how enjoyable it is to 'save' these photographs and although I find it sad that they end up without a home, it really is a joy to collect them and keep them safe.


Tuesday, 17 January 2017

A New Hobby For 2017: Learning How To Do Embroidery


I don't think you can have too many hobbies.  The only problem is trying to fit them all into what ever spare time you may have. That being said, I still decided to add to my hobby collection by learning how to do embroidery.  As you may have seen on my previous posts, I already do cross stitch but I've always wanted to learn how to embroider.


There are so many different types of stitches in embroidery which can create a brilliant array of textures and patterns. Above you can see that I've been gingerly practising a few of these.  At the moment, things are a bit wobbly but it was really fun to see the patterns a stitch can make.  I'm learning from a book I got for Christmas which is called 'How to Embroider: Techniques and Projects for the Complete Beginner', by Susie Johns. You can get a copy on Amazon here. I'd highly recommend it as the images and instructions are really easy to follow. 


I then decided to attempt a little freehand piece with my favourite stitch so far, the chain stitch. I chose a cactus because I was looking at my little baby cacti today, willing them to grow and one day flower like this one.
It was pretty fun to try to 'draw' with the thread and it was very freeing compared to when I work on my cross stitch.
I'm going to go back to practising the stitches again before attempting any more cacti...or other things. I'm also going to invest in a different type of material to work on as this cotton is a bit thin.


I'm still continuing with cross stitch too and this is my most recent project.  It's a victorian sampler kit which I got for Christmas and it's going pretty well so far. Cross stitch takes a lot longer than embroidery but it's worth seeing the image slowly appearing. I think this one will look particularly nice when it's finished as I've always loved victorian samplers so it's pretty enjoyable to create my own.


It's really fun to learn a new skill, especially when it can flow into your other work.  I'm really keen to embroider some of my own drawings in the future when I've become a bit more confident with the stitches. I'll be sure to post up my progress on here. Have you taken on any new hobbies for the new year?

SaveSave

Wednesday, 11 January 2017

Starting a planner for 2017 - Filofax Personal Size Organiser Review


So 2017 is the year I've decided to delve into the world of planners. On starting out, I didn't realise just how popular keeping a planner is these days and I also didn't realise how many different types are out there. Thankfully there is quite a big community of planner addicts with blogs, youtube videos, Pinterest accounts and Instagram pages full of tips and ideas. 

After looking through all this helpful advice I was then able to narrow my choice of planner down to a Filofax.  I thought I'd do a little review of sorts on here to pass on my thoughts to future planner owners and therefore carry on the circle of (planner) life. It took me a while to decide on the size and colour but in the end I chose 'The Original Organiser Patent' in the 'Personal' size and the colour is Duck Egg. The 'Personal' is the most well known size of planner with loads of room for extra sheets. At first, I wasn't sure whether to go for this particular size or the 'Personal Compact'. The 'Compact' is a bit more slimline for carrying about but I chose not to go with it in the end as I knew I would be adding more inserts, stickers and things so wanted to have that extra space.

In the above photo you can also see that I purchased some business card pockets as well as a zip file and some extra coloured lined pages. These all, including the planner, were bought from the main Filofax website and the delivery was really fast even though it was during the busy festive period so thanks for that, Filofax! 

On the bottom right you can see some colourful plastic dividers. I got these from the OlamDesignStudio on Etsy and I highly recommend them if you've been hunting for colourful dividers like I have. They are based in London and the delivery time for me was super fast! I got a set of typed tab stickers too (which you can see above the dividers in the photo), and you can choose from a variety of sticker sets depending on what you'd like your dividers to be for. They also do custom orders! 

Next to the stickers in the photo is a six hole punch and I bought that along with the paper cutter (also pictured). Both were bought on Amazon, the hole punch here and the paper cutter here.  I got these because I started to find so many brilliantly designed planner inserts online which you can buy, download and print. There are loads on Etsy that I have my eye on but it also gave me the idea to create my own as well.  If I create any in the future I'll be sure to post them up. 


The Filofax planner itself is made with real leather and smells amazing! It feels very hardwearing and just has that feeling of quality about it.  The patent isn't in your face super shiny patent, it's just right, and hopefully you can see that in the photos.  I also love the little button closure with the Filofax branding on it.


So what's inside? On opening the Filofax there are two card pockets, one vertical slip pocket, two elastic pen loops and one multifunctional elastic holder. I won't be using it to hold my bank cards but I will be filling up this area with decoration, clips, post it notes, that kind of thing. 
There's a transparent plastic insert at the front and following that is a set of numbered card dividers. These are handy for starting out but I'll be popping in the coloured dividers that I mentioned above. 
There are then sheets of lined, squared and blank paper, followed by sheets of coloured lined paper. I was really impressed by the amount that you get with the Filofax as it's more than enough to get you started. I plan to customise mine quite a bit but if you were to prefer to use just what is provided it would be perfect.
Continuing on we have more coloured sheets, followed by a contacts section and then the 2017 diary itself. It's a week on two pages diary but you can get other options on the Filofax website if you prefer a different layout. There are also lots of custom made diary layouts and designs that you can get from Etsy suppliers too. There's a year to view page as well as important dates and a section for personal info.  


At the back there's a vertical slip and a jot pad pocket so even more room for putting bits and bobs in.   I always lose business cards from shops I like or little flyers that I've picked up because they end up disappearing into the depths on my bag and then migrate to the bin as crushed blobs. These little pockets will be perfect for collecting things like this. 

Overall I'm really glad that I settled on getting a Filofax.  There's so many options for making it your own whether that be from the official Filofax inserts or customising it yourself. It's sturdy, has a classic quality to it and will be perfect for starting me on my planner journey. By the way, all views here are my own, and I just thought I'd share them with my fellow planner addicts. 

I got lots of new stationary items to go with it so I'll pop up a post about them soon. 
SaveSaveSaveSaveSaveSave

Sunday, 8 January 2017

The Story of my Floating Knees - A New Year Update


As I mentioned in my last post, this year is going to be a turning point for my dislocating knees. It's going to be a long journey but hopefully one that will help me walk normally and be free from the discomfort in my legs and of course the dislocating!

My legs have been increasingly uncomfortable lately to the point where I can't walk about or stand for very long periods and I often feel like they are going to give way if I don't sit down.

Thankfully my appointment for the specialist in Glasgow arrived and I went to see him at the beginning of December. I was quite apprehensive about it since I'd been told by another specialist at my previous appointment that I'd never have normal legs again. You can read more about that and my knee story here.

I didn't need to be apprehensive though as the specialist in Glasgow was fantastic!  He finally explained exactly why my knees have been dislocating and explained how they are going to treat it. Firstly, he said that even if I had the strongest ligaments in the world, my knee caps could not be held on.  The sockets are far too shallow so they will need to be deepened to keep my knee caps on.  This won't solve the problem completely though.  Another factor to my knees dislocating is that my leg bones are all facing in different directions.  This means that the bones in my lower leg are at an angle where they are often coming into contact with my knee caps and therefore knocking them off.
To stop this happening, they will need to break my legs at the top and the bottom and twist the bones to straighten them.

He also explained that the reason my legs feel so tired is due to having to walk with them bent all the time. Try standing for a minute with your legs bent and you'll feel how much your muscles begin to work. Therefore spending the day with bent legs exhausts them, so no wonder they feel like they're going to collapse all the time. If I physically straightened my legs and tried to walk like that, my knee caps would just slide off. Bending them is what's keeping them on. He also said that my knees have eroded over time with dislocating and my ligaments have become so stretched they do nothing, so this will add to the discomfort.

So, after years and years of going to numerous doctors, I've finally found out the reason my knees dislocate and have been given a solution. It was quite a shock to find out exactly what they'll have to do, and I have been told that it will be painful and I'll need to find a lot of strength to get through it all but I know that it'll be worth it.

If I can eventually walk again with straight legs and no discomfort then it is entirely worth it.  If I can go on walks in the countryside, ride a bike, finally be able to learn to drive, and spend my time without the constant fear of falling I will be putting 100% into this.

My next step is another CT scan and an MRI scan which should be happening in the next month or so. After that I'll be on the waiting list for the operations. They'll be working on one leg at a time and from the scans they'll be able to calculate more accurately how long my legs will take to recover.

So this really is the year for my floating knees!

Again, if you'd like to follow the story from the beginning, head over here.


Friday, 6 January 2017

Goodbye 2016, hello 2017!

Hello 2017, you've come around rather quickly! As a year, 2016 for me was quite a turning point for a number of reasons.  The first was that I had the chance to see what is needed to produce and sell my own art work, something that I've been wanting to do for many years.  This insight has given me the confidence and the knowledge to do just that so in the coming months I'll be starting to produce work with the view to turn it into sellable products.

My other turning point was discovering the main reason why my knees have dislocated all my life. I haven't had the chance to pop up an update about my knees (flu + Christmas), but I'll get one up soon to explain all that fully. The solution to the problem comes in the form of operations which will take up a large amount of time this year but I'm so relieved to have been given a solution to a problem that affects me on a daily basis.


I've also decided that I'm going to join the planner community this year! I didn't even realise such a community existed up until a few weeks ago.  Although we all have so many fancy apps on our phones that can sort out our diaries and to do lists, I've always preferred paper options for that sort of thing. I decided to invest in a Filofax and on looking them up online, I discovered there's a lot of love for planners out there at the moment, especially bullet journalling. There are blogs, YouTube videos, Pinterest boards and Instagram accounts full of peoples planner setups. My love of stationary and making lists took over and I got hooked quite quickly looking at these, so I have decided to officially join the community! It's also a fantastic way to start the year and will help to keep me organised. I'll be posting about my own planner setup soon as well as the new stationary I bought to start the year.

I'm also looking forward to doing a lot more crafty things this year including felting, embroidery and cross stitch. I got another fantastic cross stitch kit for Christmas, as well as felting and embroidery supplies so I'm keen to create some more pieces this year.  I often post the stages of my work on my Instagram account so if you fancy following what I do, you can find me at instagram.com/sannadyker.

I'll also be continuing to add to my old photograph collection which I'll update on here and I'll be popping up the odd book review too.  Hopefully my new organiser will help remind me to do blog posts more often!

I hope you all had a fantastic festive break whatever you were doing and I wish you all a very happy new year!

SaveSaveSaveSave